
“Amateurs train until they get it right. Professionals train until they can’t get it wrong.” Unknown
By now, anyone who has been reading my articles knows that I have an absurd amount of tactical kit. Bits and pieces, dating back to the 1950s, that accumulated over the years; as well as newer stuff I just bought or otherwise acquired as recently as last week. Enough to equip a Rifle Platoon more or less. My wife says I have way too much. She is right, but I have the tactical gear monkey firmly on my back. I have told her that when I die, she can build my funeral pyre out of all that excess equipment and give me a Viking send-off. The kind of bonfire that could be seen from low Earth orbit. She likes that idea. I am no doubt a connoisseur of tactical gear, but I do not consider myself a collector. I admit that I have more than I need, but I have not amassed any of this stuff just to admire it. Rather, I always have the intent to put it to good use.
When I was still in the Army, I experimented with anything and everything I picked up to see if it suited my purposes or was better than what I was already using. Since I retired, I still put everything I get my hands on through its paces for the same reason. For my personal satisfaction if nothing else. I have yet to find a piece of gear that I did not feel the need to modify (hack) in some fashion. Even though I am more extreme than most, I know I am not alone. Of course, as I have mentioned before, many in the ranks tend to be more pragmatic if not pessimistic. They just accept the fact that issued gear is always going to be sub-optimum for their mission or personal comfort. One size fits all and made by the lowest bidder. Perhaps their plate carrier or harness causes hot spots and in the worst cases leaves welts. Or critical gear seemingly cannot be positioned exactly where they need it to be for quick and easy access under stress. Eventually, by necessity, they apply some 550 cord, tape, and/or ad hoc padding here and there to at least make everything less painful and drive on. A few, out of frustration, will start cutting off offending pieces of webbing haphazardly and worry about turning in their gear later.
With a little tutoring, I think I can help some of those folks do a little better than that. Therefore, I am going to use the opportunity to explain some general gear principles and hacks that are undoubtedly, targeted primarily toward newer troopers. However, hopefully, old-timers will find something useful as well. Over the years, I found that many junior NCOs and Officers were poorly trained on how to configure and manipulate tactical gear in order to maximize their own efficiencies. And if they do not know how to make their stuff more effective, then they cannot teach their soldiers how to do it better either. I am going to provide a few examples of how I have worked through some problems I encountered over the years. I will also try to explain the supporting field craft lessons behind WHY I did what I did – and maybe throw in a little history as well. I am going to keep this simple, but I am not trying to insult anyone’s intelligence or level of experience. We all started from zero knowledge at one point or another.
I will begin with hacks I first started using many years ago with the older stuff. Because it was cheaper and more minimalistic than modern gear, the ALICE system was made for hacking. For example, the finicky metal clips on the suspenders were taken off by the tens of thousands and replaced with 550 cord. Additional small pouches like those for compasses and strobes could be – and were – sewn on the canteen covers. Likewise, as I have written about at length, the ALICE packs were extensively hacked and individualized by countless soldiers of that era. I know that some ALICE gear is still issued or in circulation; perhaps in ROTC detachments or maybe even some Reserve Component units out there. However, the vast majority still serving are now using some MOLLE variants. Still, since I am talking in generalities, the common hacking techniques I will describe can apply to both old and new systems.
Since the obvious shortcomings of ALICE were well known, during the 80s and 90s Army leaders typically accepted individual modifications to the gear as well as non-standard after-market substitutions – like chest rigs or holsters – in the field. Strangely, as the military transitioned to various MOLLE systems touted for their modular design features in the early 2000s, there had been something of a uniformity backlash. The attitude seemed to be that promiscuous “modularity” was a gateway drug to unchecked individual expression and that was just one slippery step removed from a catastrophic collapse of unit discipline. Therefore, as soon as a unit had been issued MOLLE, leaders felt justified – nay, compelled – to dictate and enforce strict SOPs on the configuration of tactical gear. No modifications or variations authorized! Indeed, from some of the feedback I get, it seems most soldiers today at least feel like they have a lot less latitude to modify their gear than we did back in the day with ALICE.
Here are some general “rules” to consider when hacking gear. Addition is always less problematic than subtraction. Fractions of inches matter. A relatively small alteration may be all that is needed. Before and after adjustments, try out the gear with winter gloves on. If it does not work with gloves, readjust or redo until it does. Test drive modifications in increments. Avoid major – irreversible – surgery if possible. Do not over tailor gear. Leave room to make adjustments to accommodate different missions, or inclement/cold weather clothing layers, etc. All changes should be competently executed. Half-ass frayed nylon butchery is counterproductive. Always use a “hot knife” to make and seal cuts instead of scissors for example. Heat and fire are the gear hacker’s friend – learn how to use them the right way. Always use judiciously to seal any frays, cuts, or holes, made in nylon. Make it a habit to seal the ends of 550 and bungee cord and eliminate loose threads, etc.
None of this is rocket science, but it does take practice to do it right. Experiment with unserviceable gear that you can afford to risk – not the good stuff. Of course, get professional sewing done when necessary. Have custom accessories made – or customize existing accessories like pouches at local sew shops or by making modifications yourself if you have sewing skills and a machine. In some cases, items need to simply be moved up or down to be more readily accessible. Holsters or field knife sheaths are common examples. Substitution of more suitable after-market items for issue equivalents may also be an easy option – albeit more expensive. It is true that most gear manufacturers have some proprietary intellectual property associated with their kit. However, because attachment systems compatible with PALS are commonly required with current military or other large government contracts both in the US and worldwide, it is a de facto standard that most manufacturers voluntarily conform to. Therefore, there is more commonality and interchangeability between brands than one might first imagine.
A professional soldier, like an expert in any other field, should strive for excellence. Continually seeking to master his or her craft. That, in turn, requires constantly adjusting and refining individual personal equipment and getting to know that gear – intimately. In most cases – especially at the entry level – there is absolutely no need to spend lots of cash on modifications or expensive commercial kit substitutes. But, over time, a reasonable investment of effort and money is warranted to get the best results. Whether a new piece of gear is bought or issued, take time to read the instructions first. Inspect the gear in detail. Assemble and disassemble it – after all, that is how we get familiar with new weapons.
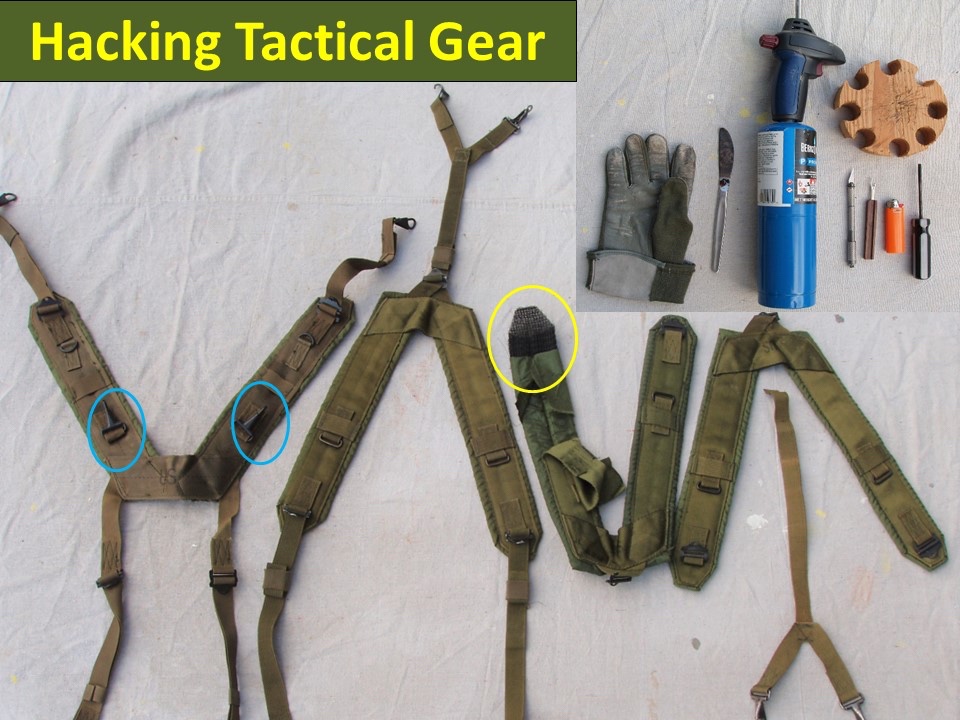
Here is a good place to introduce some cheap and simple “tools of the trade” for tactical gear maintenance and modification (above, top tight). From left to right, the first four items are my “hot knife” kit. A Nomex glove to protect my hand, an old butter knife I have used for this purpose for over 30 years, a propane torch to provide the heat required, and a round scrap block of wood that acts as a cutting/work surface. Below the block is a hobby knife. Any razor blade type cutter will work, but the hobby knife is designed for precise cutting and works especially well for this application. Next is a Thread Cutter, a common sewing tool that works well to split seams or separate sewn items. An orange Bic lighter provides the flame for other small tasks like sealing 550 cords. And, lastly, an old star screwdriver that I can heat with the torch to punch out neat round holes in nylon for surface-mounted ITW buckles. The holes in the wood block help with that. A T-handle from an old M16 cleaning rod would work as well.
So, let’s hack some simple stuff. In the same slide (above) we have some LCE/LBE suspenders. On the far left is the M1967 nylon H-Harness. It was essentially the nylon-ification of the M1956 system (not shown). I always preferred the H-Harness (4 legs) to the ALICE Y-Harness (3 legs, second from left) and used the M1967 suspenders when I could get them. However, it was not designed to be used with a rucksack as can be seen by the two metal buckles mounted on top of the yoke (blue circles). Those had to be removed or they would grind into your shoulders under weight. The back leg on the ALICE suspenders was bifurcated and I am going to refer to it as a B-Strap to differentiate it from the other, singular straps (S-Strap). Here is a fun fact: neither the M1967 nor the ALICE suspenders have any foam padding as we would now expect. Instead, a black plastic mesh was used to provide some cushioning. I peeled back one ALICE yoke (yellow circle, center) to expose it, but unfortunately, it is too small to be seen clearly in the picture. The mesh was used because it did not absorb water and, therefore, the yoke dried quickly. And that choice was in response to a common complaint by soldiers in Vietnam that the M1956 gear got wet and stayed wet in the high humidity of the jungle.
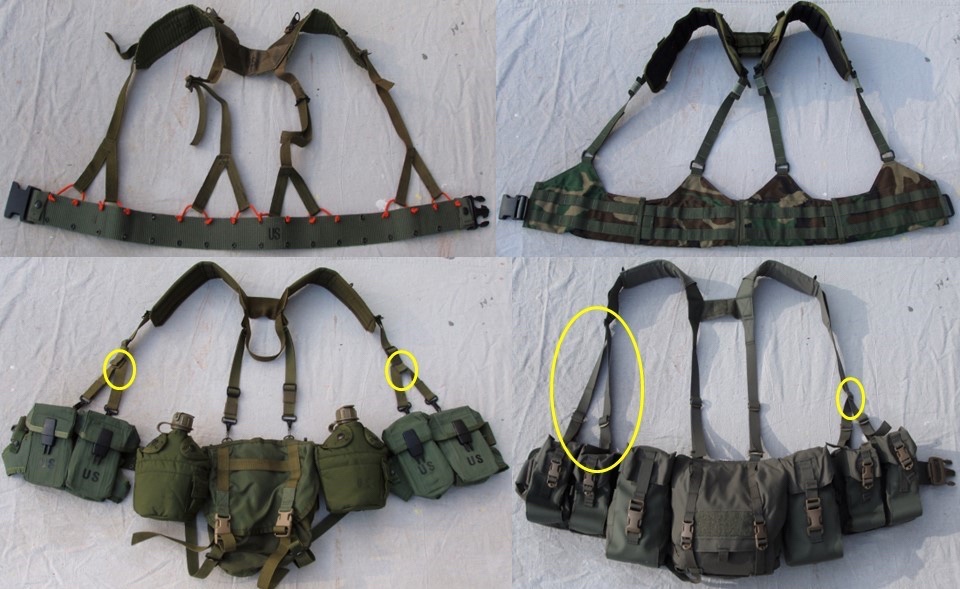
When I was issued ALICE suspenders, I usually stripped off the S-Straps in the front and replaced them with the B-Straps salvaged from a couple of other suspenders. As I said, ALICE gear was cheap and easy to come by. By the late 70s – early 80s, Surplus Stores usually had pallets of semi-serviceable examples on hand for a couple of bucks each. What good was that? For one thing, it helped eliminate pistol belt sag or droop. On the top left of the slide above I have put together a M1967 yoke with four B-Straps. All the buckles on the straps have been removed, and 550 cord is used exclusively to attach the harness to the belt. 16 points of attachment in all for this hypothetical example. On the top right is a more modern, but very similar arrangement using elements of the SPEAR ELCS and an Eagle yoke that achieves the same purpose. I used a version of this when SPEAR was first issued in ~1997-2001 before 911.
Stabilizing the belt in some fashion is especially important if you want to run a classic British style Belt Kit – as I usually did – with pouches and other gear like holsters and knife sheaths all around the circumference of the belt. Bottom left is a reconstructed example of my usual setup. In this case, I used an old Blackhawk H-Harness, left the S-Straps on the back because I normally carried a buttpack back then, and put B-Straps on the front (yellow circles) to support a total of four Ammo pouches. I routinely carried four pouches, as a lot of guys did, not to make space for more ammo; but rather to have a convenient place to put all the small tools of war I needed to carry where they would be easy to get to, like chem lights, camo sticks/compacts, mini-Maglite, and so on.
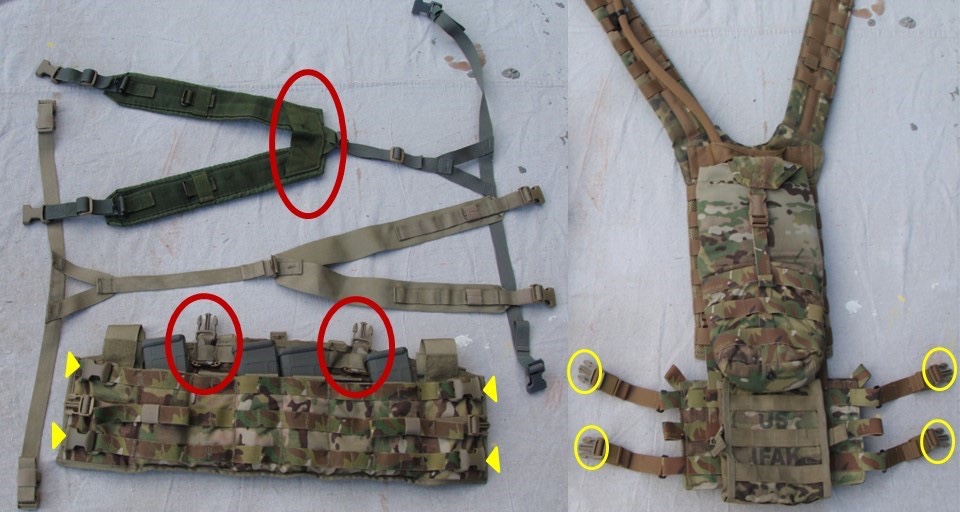
Obviously, that setup is very “old school” and has been largely – but not entirely – superseded by load carriage systems adapted for body armor applications. However, H-Harnesses are still out there and still getting the job done. Bottom right is the recent Velocity Systems “Jungle Kit” that is a modernized version in 21st-Century materials of the old system. Yet, even though this setup is an improvement in almost every way to my vintage harness, I still saw the need to make one adjustment – so far – to optimize it for me. The suspenders have two front straps on either side that come down independently from the front of the yoke portion (large yellow oval on the left side). This arrangement left a hole between the straps that was too big for my taste. I imagined myself shoving my arm through that space while rushing to get the harness on during a pitch-black night in a driving rainstorm. So, I added a flat metal triglide through both straps. And slid the triglide down to form an inverted V similar in size to the one on the old B-Strap (small yellow circle, bottom right). That small adjustment/addition solved the problem to my satisfaction.
How about bringing old ALICE components further into the 21st Century? Above (left) is the current issue Tactical Assault Panel (TAP) in service with the Army and Marines. I have admitted before that I do not have “real world” experience with this system since it was just hitting the streets when I was getting out. But I have been playing with it now for several years and I have some suggestions that I think make it better. The body has built-in pockets for six 5.56 magazines and the two outer pockets can hold slightly larger items like GPSs, some IMBITR radios, and 7.62 magazines. That is a good thing. I tucked the flaps that come with the magazine pockets inside and put in Kydex inserts to hold M4 magazines in place. I am just not fond of flaps for this particular application. Because the TAP is designed to “plug and play” with IOTVs or plate carriers, other pouches like IFAKs and various utility pouches are usually added on the front (not shown). That puts all the weight on the front and that has always been a common problem with classic chest harnesses. In the old days, a rucksack on the soldier’s back helped balance the load fairly well and body armor was not a factor. Times have changed.
The independent Y-Harness that comes with the TAP (center left) is certainly minimalistic and also clearly shows its ALICE DNA. The darn thing is even bifurcated in the back! It also is not that comfortable. It is true that a wider shoulder strap – like found on the FLC or A-TAP – can be reasonably comfortable without padding; however, the TAP yoke is unpadded and narrow. When I put six loaded magazines in the TAP with this harness it rides the sides of my neck in a way I would not find comfortable for any length of time. Some adjustments are needed. First, I looked for a way to spread the front of the straps out as much as possible. I used two T-Bars (red circles) through the top side webbing loops to give me another couple of inches of space. I tucked the buckles that come with the TAP into the stow pockets on the back. Indeed, I cut nothing off the TAP or made any permanent changes.
The extra space in the front helped, but alone was not enough. The narrow V of the TAP yoke still rode up on the back of my neck uncomfortably. The rear of the yoke needed to be wider – say like the ALICE yoke. Therefore, I built a hybrid ALICE/TAP harness (top left). It provides some much-needed cushioning along with wider shoulder straps, and a crossbar in the back to hold it further apart (top red circle). It is a simple adaption, but it helps the TAP ride a lot more comfortably in my opinion. In fact, I think if some entrepreneur manufactured a good number of reasonably priced ALICE/TAP harness hybrids in OCP (Army) and Coyote Brown (Marines) there would likely be a ready market. Just call it the A1 version and units might even buy it. In any case, I would argue it is a demonstrably “more better” harness and would be a clear product improvement over the current issue item.
Still, I was not entirely satisfied and for strictly personal preference, I cranked it up to 11. On the right, I used an old Eagle harness and other pieces I had on hand to make my preferred H-Harness style to replace the Y-Harness version entirely. If I was running this setup as a standalone rig, I would consider putting the IFAK on the back and a hydration carrier as shown. By putting those items on the back, they provide some counterbalance to the heavier front load. Some female QASM buckles on the front of the TAP (yellow triangles) and male buckles on the H-Harness (yellow circles) stabilizes the entire rig the way I like it. That is enough hacking for now. More to follow. Of course, none of my examples or suggestions may be directly applicable to anyone else’s situation or preferences. However, everyone who uses tactical gear should be able to functionally triage their kit, identify things that need to be changed, rearranged, adjusted, removed, or replaced, and not be afraid to make those changes.
De Oppresso Liber!
LTC Terry Baldwin, US Army (Ret) served on active duty from 1975-2011 in various Infantry and Special Forces assignments. SSD is blessed to have him as both reader and contributor.
You can skip to the end and leave a response. Pinging is currently not allowed.


 NSN: 1240-99-984-0230")
