

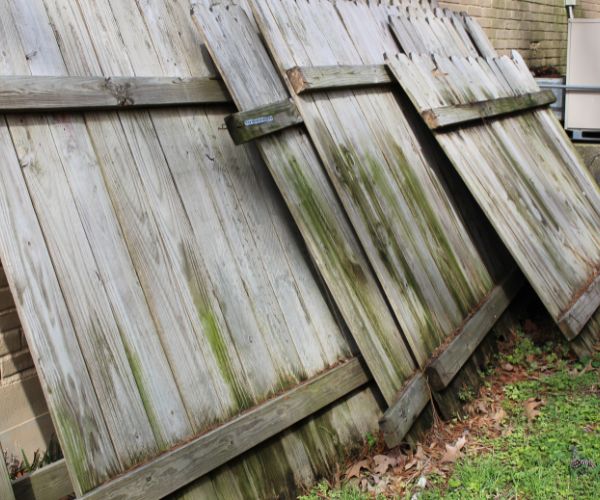
A windstorm recently blew over about a hundred feet of my picket fencing. While I could have taken it to the dump or paid to have it hauled off, there was so much salvageable wood that it seemed a waste to just throw it all away.
All in all, a hundred feet of fence left me with roughly 85′ of 4x4s, 200′ of 2x4s, and over 850′ of 1x6s. With a little creativity and a bit of hard work, I’ve decided to put it all to good use.
Here are some of the things I’ve been able to do so far, along with a few other ideas that I’ll work on throughout the year.
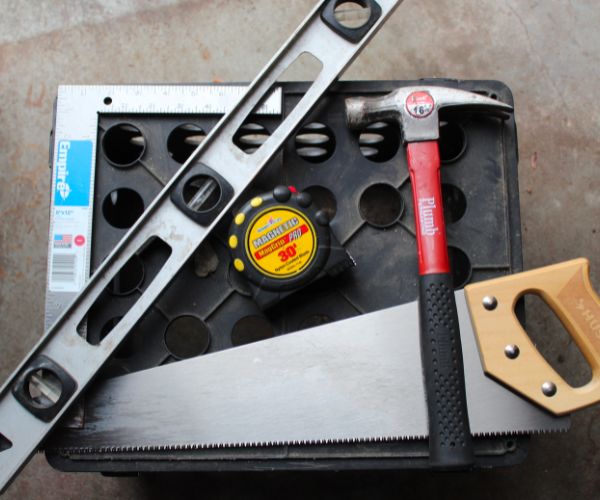
1. Sawhorses
First things first! Any construction project needs a good set of sawhorses. I’ve desperately needed them for quite some time, but being frugal, I kept putting it off. This seemed like the perfect opportunity to save $75.
While there are dozens of blueprints for building sawhorses, I chose this method due to its simplicity. There’s no need to cut any angled boards and the assembly is easy enough even without power tools. Feel free to adjust the measurements to suit your needs.
Materials:
- 6 – 30″ 2×4
- 8 – 26 ¼” 2x4s
- 24 – 3″ wood screws or nails
- Saw
- Hammer
- Drill
Start by salvaging six 30-inch 2x4s (assuming you’re building two), and construct two I-beams. Alternatively, cut three if you only need one. I used four screws on both the top and bottom to secure the beam.
Next, cut eight 26 ¼” sections for the legs. Place one end of the 2×4 just under the lip of the top 2×4 on the I-beam and screw two 3″ wood screws into the “I” portion of the beam. Then screw an additional two screws into the bottom leg of your beam. This task is much easier if you drill pilot holes first.
Repeat this process until you’ve attached all eight legs. Although I didn’t, you could opt to attach leg bracing toward the bottom.
2. Raised Garden Beds
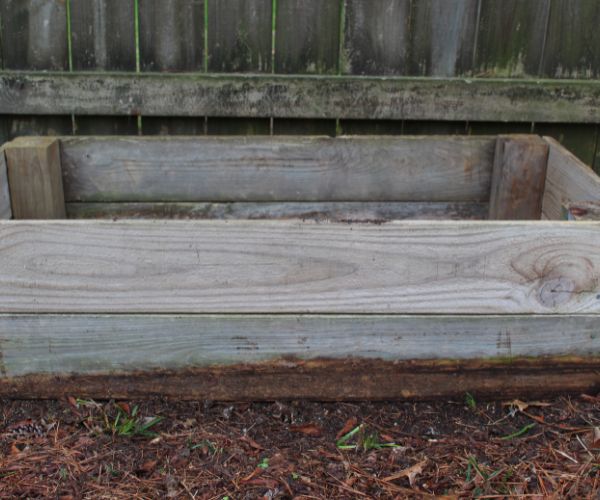
Gardening season is right around the corner, and raised garden beds are quite expensive. So I’ve taken advantage of the opportunity to build some for free. I even reused the nails from the original fencing. So these boxes literally cost me $0.
Materials:
- 4 – 1′ 4x4s
- 4 – 4′ 1x6s
- 4 – 2′ 1x6s
- 32 – 2″ galvanized nails or wood screws
- Saw
- Hammer
- Square
I’ve taken a single 4×4 post and cut it into one-foot sections. Next, I took six 1×6 pickets and cut off the dog-eared tops and rotted bottoms, which left me with four-foot sections. I cut two of those in half, which gave me four two-foot pieces.
Once all the pieces were cut, I was able to construct a 2-foot by 4-foot raised planter. The hardest part of this project was keeping the box square when nailing it all together. Don’t forget to leave just a little bit of space between the pickets to allow for expansion and contraction.
The measurements and the wood can be adjusted to whatever you have on hand. This video uses 2×6 and 4×4, but the concept is the same:
3. Wall Shelves
I’m always looking for space-saving alternatives for my outdoor shed to cut down on clutter. This is a quick and super easy way to get organized.
Materials:
- 1 – 24″ 1×6 picket
- 2 – shelf bracket supports
- 4 – #8 1″ screws
- 4 – #10 ¾” screws
- Saw
- Sandpaper
- Level
- Drill
I say 24″ picket because this is the usual distance between studs, but the length can be adjusted to suit your needs. However, I’d recommend adding a bracket for each additional stud you use.
Start by cutting the length of your picket. While not absolutely necessary, you may want to sand the board first to prevent splinters. Using the #8 1″ screws, screw the brackets into your studs, making sure they are level with each other.
Place your cut and sanded picket on the top of the brackets and center. Hold the picket in place while drilling the #10 ¾” screws upward into your picket. If you’re working with drywall or paneling, this video walks you through how to locate your studs, but the process is essentially the same:
4. Tool Racks
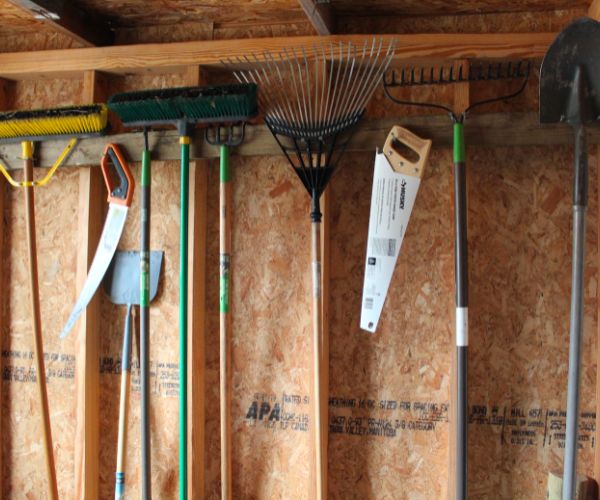
Tool racks are a great way to organize your workshop and maximize your floor space. Here’s an extremely inexpensive way to construct your own tool rack for your shop.
Materials:
- 1 – 2×4 any length
- 6″ nails or utility hooks
- Saw
- Hammer
Commercial tool racks can be quite costly, and so can building them when you consider the price of lumber these days. However, with a reserve of free wood, you can accomplish the same task with a few 2x4s and nails.
In most cases, heavy-duty nails are sufficient to bear the weight of most tools. However, if you want to splurge, buy some heavy-duty utility hooks.
For this project, simply cut a 2×4 to your desired length and nail it to as many studs as possible along the wall where you are hanging it. Make sure it’s level. Once your 2×4 is hung, starting on one end of the 2×4, hammer nails into the center of the 2×4 approximately 2 ½” apart, but only nail them halfway.
You can use the protruding nails to hold your handled tools (e.g., shovels, rakes, etc.), extension cords, saws, and a variety of other tools. Because different tools have different widths, you’ll have to eyeball the distance between the sets of nails.
There are several variations of this project floating around YouTube, but here’s one that gives you an idea. However, instead of cutting pipe and drilling holes like this video shows, simply hammer heavy-duty nails or spikes.
5. Birdhouse
For pollinating your garden or eating those pesky bugs, every backyard needs birds! Here’s a birdhouse so simple even a child could build it.
Materials:
- 2 – 8″ 1×6 boards
- 4 – 6″ 1×6 boards
- 1 – 3″ screw
- Saw
- Wood glue
- Finishing nails
- Hammer
- Drill with 1″–2″ hole-saw or spade bit
- Sandpaper
There are hundreds of ways to make a birdhouse out of reclaimed wood, but this one requires no angles and only a few cuts. Throw in some wood glue and finishing nails and you have a birdhouse.
Begin by cutting the lengths, as well as sanding the boards if you like. Join the two 8″ pieces in a square fashion to create the floor and back wall of your birdhouse. The back wall should flush with the bottom board instead of resting on top. Glue the boards and then drive the finishing nails for added stability.
Attach one six-inch piece to each side. The 1×6 pieces should be horizontal and rest on top of the floor piece. Glue and nail in the same fashion. Next, glue the roof and drive the finishing nails.
Drill a 2″ hole in the final piece and sand any rough edges. Place it vertically resting on the floor of your birdhouse and flush with the two sides and roof. Glue and nail into place.
I attached mine to a fence post by drilling a 3″ wood screw through the additional two inches on top. However, there are a variety of different ways and places you could hang this. Although not exact, here’s a similar version:
6. Wood Boxes
Materials:
- 3 – equal length 1×6 boards
- 2 – 6″ 1×6 boards
- Sandpaper
- Wood glue
- Finishing nails
- Hammer
- Saw
Wood boxes make great storage options for all the little knickknacks in your garden shed. To construct one, cut three boards of equal lengths (your choice), and sand any rough edges.
Glue them together as a bottom and two sides, then evenly space finishing nails for added durability. Next, cut your end pieces at 6″ wide and sand the edges.
Attach them to the ends of your box frame using wood glue and finishing nails. Feel free to adjust the dimensions of your box as necessary.
You now have a storage box or two for all those little things you could never figure out where to store.
Here’s a basic instructional video for building a standard box:
7. Bottle Opener
This is a great project to place near your cooler or BBQ area when grilling outdoors. It’s a great idea to keep all the bottle caps from ending up on the ground.
Materials:
Cut a 12″ board and decorate it to your liking. Place the board vertically and mount a cast iron bottle opener centered at the top.
Around the bottom center, screw a 4″ band clamp onto the wood. Place your mason jar inside the clamp and tighten it until the jar is firmly secure.
Now you have a bottle opener for your next outdoor BBQ, and you won’t have to spend the next day picking up all the bottle caps lying in your yard.
8. Barnwood Picture Frames
Materials:
- Wood
- Saw
- Sandpaper
- Square
- Router
- Wood glue
- Stain, finish, or varnish (optional)
First, select a few nice pickets from your stash. Maybe some with knotholes for added character. Determine what size you want your frame to be and cut the pickets down to size. With this project, you won’t need to worry about 45-degree angles.
Sand your boards nice and smooth for a more finished look, or leave them be for a more rustic appearance.
Set two of your boards parallel and horizontal. On top of these pieces, place the other two parallel and vertical, using your square to keep them in line. Glue and nail them in place. Measure the distance between the two vertical boards and cut two additional boards to flush the space in between.
Glue and nail them in place. Router the frame space if desired, or simply staple a picture to the back. Stain, finish, or varnish as desired.
Here’s an instructional video that probably makes more sense:
9. Hanging Rack
Much like our tool rack, you can build a variety of other racks to hang hats, coats, towels, and even wine. Here’s the simplest version that you can hang just about anywhere.
Materials:
- 1 – board
- Sandpaper
- Wall hooks
First, cut your board to your desired length and sand it down nice and smooth. You definitely don’t want any splinters getting caught up in your garments. Feel free to paint, stain, varnish, or decorate any ole way you please.
Evenly space your wall hooks along the distance of your board, leaving approximately three to four inches on each end. You can then mount this to a wall using a variety of techniques. It’s as simple as this:
10. Plank Wall
If you have enough wood, you can give any outdoor building a more rustic look by using old pickets to construct a plank wall. Hang them horizontally, vertically, or even diagonally to suit your taste.
Whether you run them from floor to rafters or just as a pony wall, they can add a nice touch to your shop, man cave, or she-shed. This is a pretty elaborate idea, but gives you a nice rustic visual of what’s possible:
11. Yard Art or Wall Art
There are all sorts of DIY projects for yard art and wall art using pieces of picket fencing. From hanging signs to yard projects, the list is infinite, but here are just a couple of ideas:
12. Landscaping Projects
Last but not least, you can use any 2x4s or 4x4s in the same fashion as landscape timbers. From walkways to retaining walls to edging, there are all sorts of creative ways to put your repurposed fence wood to work.
Consider any areas in your yard that could use a little maintenance or pick-me-up.
If I were to buy all this wood new, it would cost me anywhere from $800–$1200. Think of all the money I just saved. Repurposed wood is often just as durable as new wood. It just appears a bit weathered. Don’t let it all go to waste.


 Uses And Benefits")

 NSN: 1240-99-984-0230")
